A gravel plant wanted to save space and set its feed conveyor a few degrees steeper. On paper the sums worked out: the conveying height was right, and the belt needed less floor space. Then the belt started up. Past a certain angle, the gravel simply rolled back down the smooth belt, and part of each load never arrived at the top. Whatever rolled back collected at the bottom and before long choked the loading point. The belt was moving half its material downhill instead of up.

Why a smooth belt gives up at about 20 degrees
A smooth, troughed standard belt, which the idlers shape into a trough across its width, conveys reliably only at inclines of about 10 to 20 degrees, depending on the bulk material. Above that, the material starts sliding back down the belt. The limit sounds low, and plenty of operations set their conveyor steeper anyway, because at first it works and the roll-back only becomes apparent in continuous operation.
The reason is not the belt. It is the material. On a running belt, bulk material settles flatter than it does in a resting pile, usually 5 to 15 degrees flatter, with some materials by as much as 20 degrees. Once the incline approaches that line, nothing is left to hold the grain in place. It is like a shovelful of sand on a board you slowly tilt: up to a certain angle the sand stays put, then the whole load lets go at once.
On top of that, the limit is not a sharp one. The effective surcharge angle, the angle at which bulk material only just stays put, is no fixed material constant on a vibrating belt; it drops with belt speed and conveying length, because every pass over an idler shakes the material a little further apart. That is why the friction-based incline limit cannot be pinned down to the exact degree; it depends on the material. If you want to convey steeper, you need a design that holds the material instead of relying on friction.
From rough-top to sidewall: which belt manages which angle
Between the smooth belt and vertical conveying sit several belt types, and each one pushes the incline limit a little higher. A public overview from a freely available engineering handbook sorts them by their maximum incline.
| Belt type | Maximum incline | How it does it |
|---|---|---|
| Smooth standard belt | 10 to 20° | Pure friction, the material lies loose on the surface |
| Rough-top belt | up to 35° | Textured cover, a little more hold for the grain |
| Chevron / profiled belt | up to 40° | Cleats vulcanised into the cover slow the roll-back |
| Sidewall belt (pocket belt) | up to 90° | Sidewalls and cross-cleats enclose the material in pockets |
| Bucket elevator belt | up to 90° | Mounted buckets lift the material vertically |
The last jump in the table is the biggest one. Fully enclosed designs such as pipe or pouch belts gain at least 50 percent more incline over an open conveyor by wrapping themselves around the material. The sidewall belt goes further still, all the way to vertical. Everything between smooth and chevron keeps working with friction and grip on the belt surface, while the sidewall works with pockets.

How a sidewall belt is built
A sidewall belt is made of three parts that together do something none of them manages alone. The foundation is a load-bearing belt, the base belt. Flexible corrugated sidewalls are vulcanised onto its two edges. Between them sit cross-cleats, ribs running across the direction of travel. Sidewalls and cleats form rectangular pockets, and in those pockets the material rides along even when the belt is vertical. Each pocket is bounded below by the base belt, at the sides by the sidewalls and in the direction of travel by the cleats.
Because the material sits in the pocket volume and not on a friction surface, a sidewall belt carries more in steep-incline service than a smooth belt and more than a chevron belt. The load-carrying capacity in the steep section therefore comes from the walls of the pocket.
For that to work, the belt has to stay stiff across its width. It never runs over troughed idlers but always over straight, continuous rollers, and it must not sag between them. That is why most sidewall belts use a cross-stabilised base belt: one or two fabric or steel plies running across the direction of travel, above and/or below the longitudinal tension members, the plies that take up the tensile force in the belt. These transverse plies stop the belt from troughing. They keep the sidewalls standing under load. According to manufacturer data, two plies with transverse reinforcing threads run through the belt for this, made of glass fibre where the demands are higher, instead of monofilament, a thread made from a single synthetic fibre.
The dimensions behind all this are surprisingly large. Publicly documented sidewall heights run from 35 to 600 millimetres. Short sidewalls are plain rubber; taller ones, from about 140 millimetres, are fabric-reinforced. A single manufacturer’s catalogue quotes a narrower range of 25 to 400 millimetres, which shows how much the figures vary from supplier to supplier. One rule holds across the board, though: the sidewall must stand 10 to 20 millimetres taller than the chosen cleat. Otherwise the material does not sit safely in the pocket, and the sidewall cannot flex freely as it travels around the pulley.

Up to 90 degrees in one continuous belt
The real advantage of the design is that a sidewall belt links every angle in a single run. The belt can travel from horizontal through any incline into the vertical and back again, without the material being transferred anywhere along the way. Up to 90 degrees, vertical, is the documented upper limit of the design.
The difference from a classic bucket elevator is exactly this continuity. A bucket elevator also lifts material vertically, but it is confined to the vertical section and needs separate conveyors before and after it. The sidewall belt picks the material up at the loading point, pulls it up the ramp, lifts it vertically and discharges it at the top, all with the same belt. That removes the need for several drives, and there are no intermediate transfer points where material would otherwise get crushed or spilled.
Sizing: cleat pitch, cleat height, pulley diameter
As elegant as the design is, it wants to be sized just as carefully. There is no unified public standard for sidewall belts; practice leans on manufacturer handbooks and on rules of thumb built around lump size and conveying angle. The figures below are exactly that, rules of thumb, not standardised requirements. They set the direction; the specific plant decides.
The cleat pitch should be at least twice the largest lump size, the cleat width at least 2.5 times. Both keep large lumps from jamming between the cleats or bridging instead of dropping into the pocket. The cleat height follows the conveying angle: the steeper, the taller.
| Conveying angle | Recommended cleat height (g = largest lump size) |
|---|---|
| 0 to 60° | 0.75 to 1.0 × g |
| 60 to 75° | 1.0 to 1.2 × g |
| 75 to 90° | 1.5 × g |
As a rough guide for belt width, manufacturers quote about four times the sidewall height. These rules of thumb interlock, and working through in your head which angle fits which build height and which pocket volume is tedious. A tool like the Sidewall Belt Visualizer takes that juggling off your plate and lets you see the geometry instead of imagining it.
One point decides service life and is easily overlooked: the diameter of the deflection wheels and pulleys, that is, of every point where the belt changes direction. Sidewall belts need larger diameters than standard belts so the sidewalls are not overstressed as they travel around them. Build too small here and you are treating the sidewall like a wire you keep bending too tightly: you get away with it a few times, then it snaps at the bend. The minimum diameter follows either the fatigue limit of the sidewalls or the requirement of the base belt, whichever value is larger.
Above 70 degrees of incline, the inclined section needs neither carrying nor return idlers; the belt runs free there. On the return side, support idlers are tilted slightly for tracking; the public recommendation is 3 degrees for steel-cord belts and 5 degrees for fabric belts. Where the horizontal sections are short enough, the belt may sag freely by up to 4 percent.
The flip side: cleaning and wear
A concrete plant running a cleated belt had a cleaning problem nobody had thought about beforehand. The wet, fine sand packed itself in between the profiles and could no longer be shifted with a standard scraper. After a few weeks the pockets were running half full, and the belt was carrying noticeably less than it should. That is the catch with any design that encloses the material: what is good at holding on is bad at letting go.
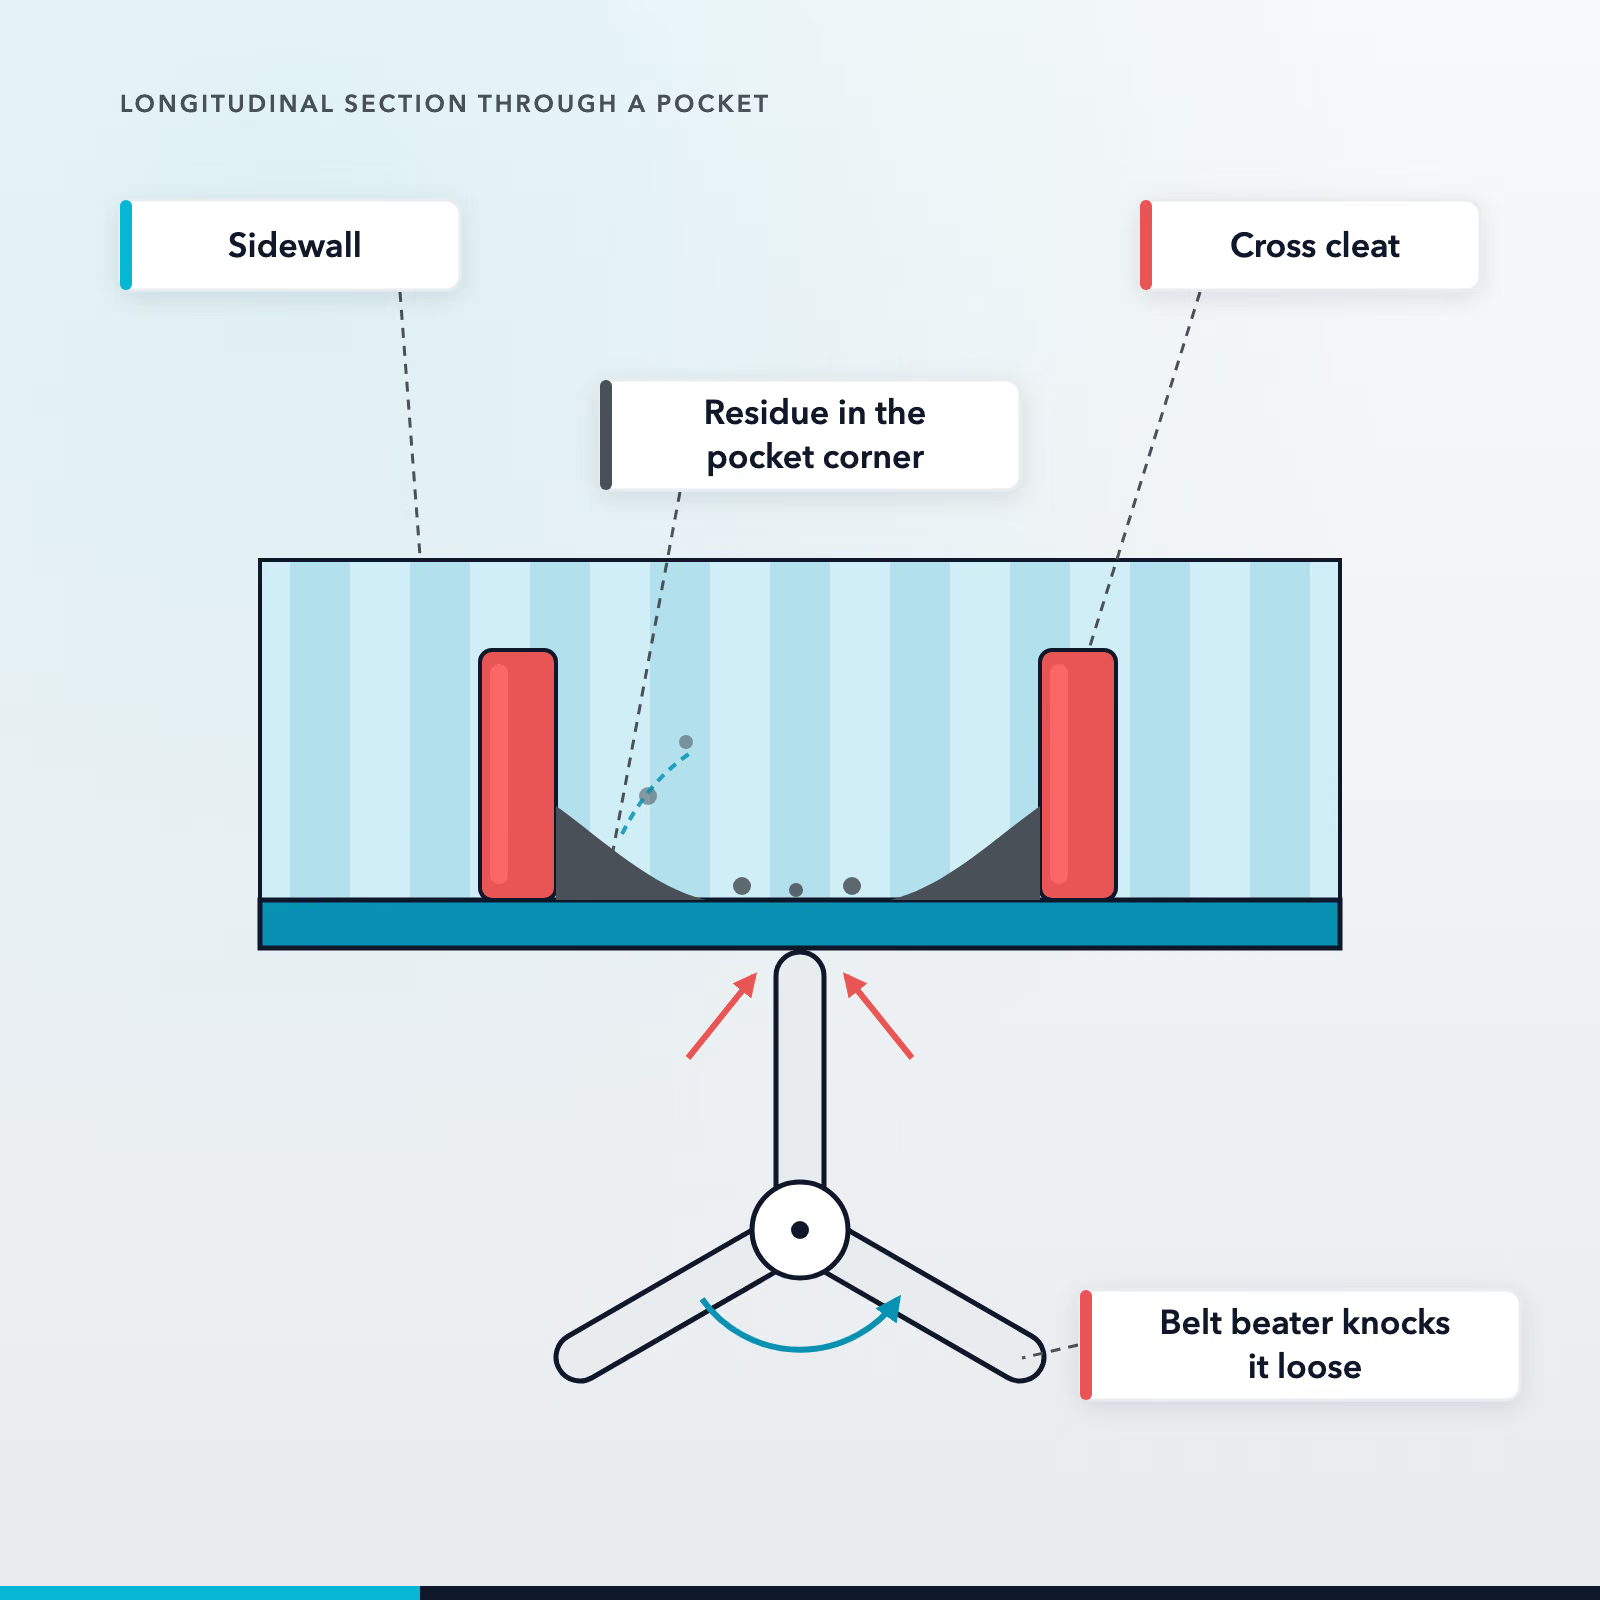
Moist fines in the pockets behave like wet sand in a mould. A scraper riding over the edges reaches the tops but never the bottom of the pocket. That is why sidewall belts are cleaned with belt beaters that shake the pockets out, with air knives, or with spray water and wash boxes. Often a self-driven beater runs along, twisting the belt slightly on the return run so the material drops out of the pockets. Cleaning therefore belongs in the plant design from the start.
Two more cost traps belong in the same honest calculation. The first is the undersized pulley diameter already mentioned. Saving on diameter is one of the most expensive mistakes on sidewall belt installations, because flex fatigue eats the sidewalls away long before the belt would otherwise be worn out. The second is a badly chosen cleat pitch. If the cleats sit too close together relative to the lump size, coarse material jams, bridges and gets crushed instead of dropping cleanly into the pocket. The belt then runs half empty and grinds up its own material as it goes. Sizing and operating costs are tied together more tightly here than the brochure lets on.
What the design really saves: transfers, footprint, idlers
If a sidewall belt justifies its higher price, it does so through three items that do not appear on the belt itself. The first is the transfer points it eliminates. Because one belt runs through from loading to discharge, the intermediate transfers disappear, and every transfer you eliminate saves a chute, a scraper, a drive and a dust source. Plus the maintenance hanging off every one of those points. That part is documented, not estimated: the continuous belt avoids material loss and lump breakage at the transfers.
The second item is the footprint. Instead of a long, shallow ramp that ends at about 20 degrees with a smooth belt, the sidewall belt lifts the same height on a small footprint, up to vertical. How much space that saves in the end depends on the project; a blanket percentage would be a guess, not a documented figure. But the incline limits provide the basis for the calculation, and in cramped plants the space advantage is often the argument that carries the decision.
The third item is the idlers. Above 70 degrees the steep section needs no carrying and no return idlers, and fewer idlers means fewer bearings, fewer maintenance points, fewer spare parts. Add that up across the years a plant operates and the purchase price of the design starts to look different. Up front, the sidewall belt costs more; whether that pays off is decided by what it makes unnecessary around it.
Chevron or sidewall: making the right choice
Colloquially, both often go by the name cleated belt, and that is exactly what leads selection astray. They work on fundamentally different principles. A chevron or profiled belt has its cleats vulcanised directly into the cover, the top rubber layer of the belt. They raise friction and grip on the surface, so the material also braces against the cleats. That buys a limited amount of extra incline, in practice up to around 40 degrees. The material still lies open on the belt, just with more hold.
The sidewall belt, by contrast, encloses the material in pockets and carries it up to 90 degrees without slipping back, with higher load-carrying capacity in the steep section. The rule of thumb for the decision is simple: if the middle angle range is enough and you want a simpler, more rugged cover, the chevron belt is often the cheaper answer. If it has to go steeper, vertical even, or if one single belt is to link horizontal and vertical sections, there is no way around the sidewall belt. Where exactly the line between the two runs and how to select a chevron belt in the middle range deserves an article of its own.
- A smooth belt conveys reliably only up to about 10 to 20 degrees. Above that the material slides back, because the surcharge angle flattens out on a running belt.
- A sidewall belt holds the material not by friction but in pockets formed by sidewalls and cross-cleats. That lets it convey at any angle up to 90 degrees, vertically, in one continuous belt.
- The base belt is cross-stabilised so it does not trough under load. Sidewall heights run from 35 to 600 millimetres, and the sidewall stands 10 to 20 millimetres taller than the cleat.
- Sizing follows rules of thumb, not a standard: cleat pitch at least twice the lump size, cleat height by angle, plus larger pulley diameters.
- The flip side is cleaning. Full pockets carry less, so belt beaters, air or water belong in the plan from the start.
- The economic lever sits next to the belt: eliminated transfers, a small footprint, fewer idlers in the steep section.
Frequently asked questions
Up to what angle can a sidewall belt convey?
Up to 90 degrees, which means vertically. That is the documented upper limit of the design. A sidewall belt can even run from horizontal through any incline into the vertical and back again, all in one continuous belt. For comparison: a smooth belt manages about 10 to 20 degrees, a chevron belt up to around 40 degrees.
Why does material slide back on a smooth belt from around 20 degrees?
Because bulk material settles flatter on a running belt than in a resting pile, usually 5 to 15 degrees flatter, with some materials by as much as 20 degrees. Once the incline approaches that angle, nothing holds the grain in place any more and it slides back. A smooth belt works by friction alone, and friction is not enough for steeper conveying.
What is a sidewall belt made of?
A cross-stabilised base belt with corrugated sidewalls vulcanised onto its edges and cross-cleats in between. Sidewalls and cleats form pockets that carry the material along even vertically. The cross-stabilisation stops the belt from troughing and thereby keeps the sidewalls upright.
How do you size cleat pitch and cleat height?
By public rules of thumb built around lump size and conveying angle, not by a unified standard. The cleat pitch should be at least twice the largest lump size, the cleat width at least 2.5 times. The cleat height grows with the angle: lower up to 60 degrees, taller above that, up to about 1.5 times the lump size beyond 75 degrees.
What is the difference between a chevron belt and a sidewall belt?
A chevron belt has its cleats vulcanised into the cover, the top rubber layer of the belt, and raises friction on the surface, which in practice is good for around 40 degrees. A sidewall belt encloses the material in pockets and carries it up to 90 degrees, vertically, with higher load-carrying capacity in the steep section. Chevron holds the material on the surface; the sidewall holds it inside walls.
It designs the sidewall belt including capacity and data sheet, with a 14-day free trial.


